
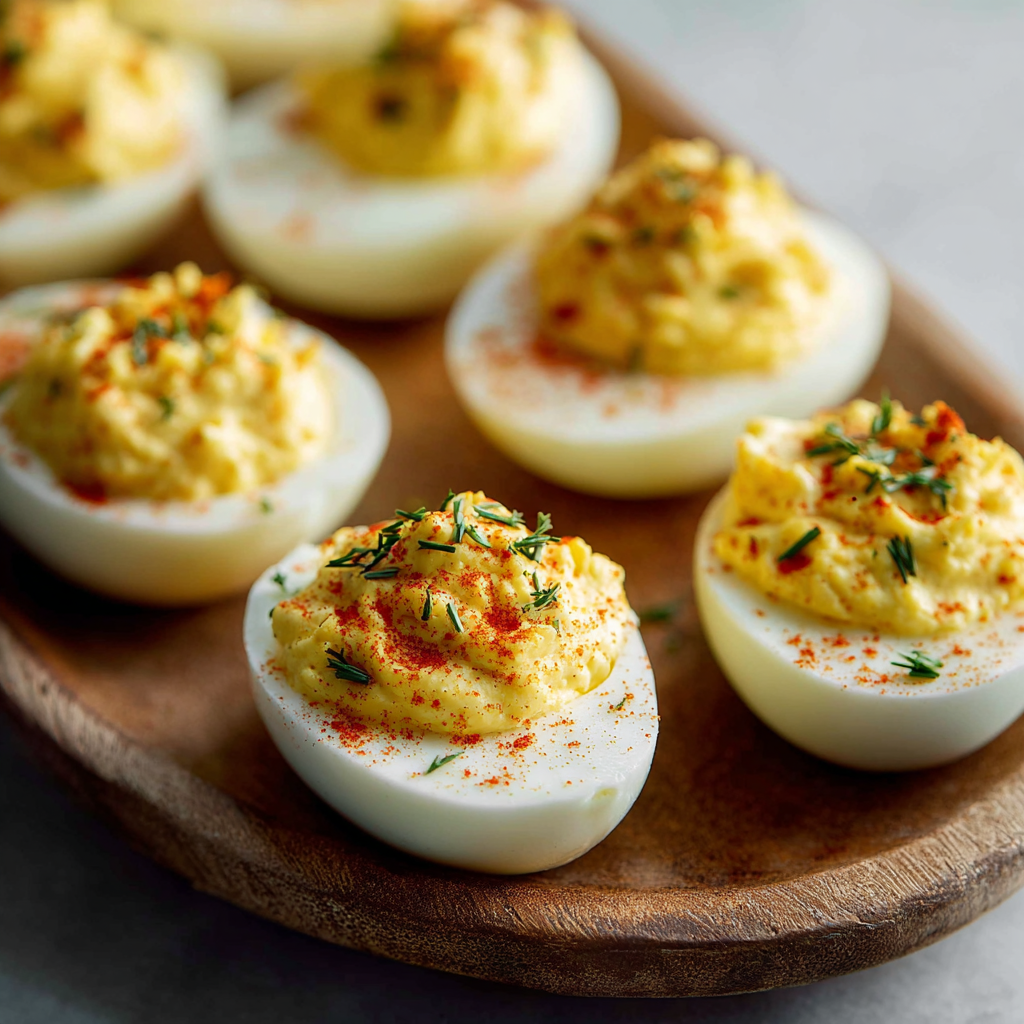
Classic Deviled Eggs

Perfectly creamy deviled eggs made with mayonnaise, pickle relish, and Dijon mustard — a timeless, crowd-pleasing appetizer that's quick to prepare.
Why You'll Love This Recipe
- Ready quickly: from start to finish in about 25 minutes, making it ideal for last-minute entertaining or weekday sides.
- Pantry-friendly: uses simple ingredients like mayonnaise, mustard, and relish that are easy to keep on hand year-round.
- Flexible: simple swaps (Greek yogurt for mayo, avocado for richness) let you adapt to dietary needs without losing flavor.
- Make-ahead friendly: you can prepare the filling and whites a day ahead and assemble before serving for stress-free hosting.
- Crowd-pleaser: mild, familiar flavors appeal to kids and adults alike, and variations let you add heat or herbs for grown-up tastes.
- Transportable: sturdy enough to travel to potlucks when stored in a shallow container with a chilled ice pack underneath.
Over the years I’ve discovered little tricks that make a big difference — a teaspoon of baking soda in the boiling water helps the shells slip right off, and a five-minute ice bath firms the whites so they nestle perfectly with the filling. My family always fights over the first platter, and I’ve learned to reserve a few halves if I want one for myself when they’re fresh and still a bit warm from assembly.
Ingredients
- 12 large eggs: Choose fresh but not ultra-fresh eggs — eggs that are a few days old peel more easily. Organic or free-range are nice for flavor, but standard large eggs work perfectly.
- 1/3 cup mayonnaise: Use a full-fat mayonnaise for the creamiest filling. For a lighter option, swap half the mayo for plain Greek yogurt (see substitutions below). I like Hellmann’s or Duke’s for classic flavor.
- 2 tablespoons pickle relish: Sweet or dill relish both work; sweet relish gives a subtle sugar-kissed tang while dill keeps the taste savory. You can substitute 2 tablespoons of finely diced dill pickle for a chunkier texture.
- 1 1/2 teaspoons Dijon mustard: Adds bright acidity and depth. Yellow mustard can be used if you prefer a milder tang, but Dijon gives the filling that classic, slightly sharp backbone.
- Salt and freshly ground black pepper: Season to taste — start with 1/4 teaspoon salt and a few grinds of pepper, then adjust after mixing the yolks.
- Paprika for garnish: A final dusting of sweet or smoked paprika adds color and a hint of aroma. Fresh chives or crumbled bacon are great alternatives for garnish.
Instructions
Hard boil the eggs — Stovetop method: Place the eggs in a single layer in a saucepan and cover with cold water by about 1 inch. Heat over medium-high until the water reaches a full rolling boil. Stir in 1 teaspoon baking soda (this raises the pH of the water and helps the shell separate), cover with a lid, remove from the heat, and let rest for 12 minutes. Transfer immediately to an ice water bath and chill at least 5 minutes to stop cooking and make peeling easier. Hard boil the eggs — Instant Pot method: Pour 1 cup water into the Instant Pot and place a wire rack or trivet inside. Arrange eggs on the rack, close the lid, and set to high pressure for 5 minutes. Allow a 5-minute natural release, then quick-release remaining pressure and move eggs to an ice bath for 5 minutes. This method yields very consistent yolks and is great when you want predictable results. Hard boil the eggs — Oven method: Preheat the oven to 325°F (163°C). Place each egg in a standard muffin tin cup to keep them from rolling and bake for 30 minutes. Remove and cool in an ice bath for at least 5 minutes. The oven method is hands-off and convenient if you’re already using the oven for other components. Peel and prepare: Crack the cooled eggs gently and roll them under your palm to loosen shells. Peel under running water if needed. Slice each egg lengthwise and carefully remove yolks to a mixing bowl, keeping the whites intact on a serving platter or tray. Make the filling: Add mayonnaise, pickle relish, and Dijon mustard to the yolks. Mash with a fork until smooth and creamy, then season with salt and freshly ground pepper to taste. Adjust texture with a little more mayonnaise or a splash of pickle juice if you like a thinner filling. Assemble: Spoon a generous dollop of the yolk mixture back into each egg white half, or transfer the filling to a piping bag and pipe neat swirls for a fancier presentation. Sprinkle with paprika and top with chives or crumbled bacon if desired. Chill briefly before serving for best texture. Store: Cover and refrigerate assembled halves up to 2–3 days, depending on egg freshness. For longer storage, keep whites and filling separate and assemble within 48 hours of boiling.
You Must Know
- Nutrition snapshot: roughly 89 calories, 6 g fat, 6 g protein per serving — a protein-rich appetizer that keeps guests satisfied.
- Storage: assembled halves keep 2–3 days refrigerated; filling and whites stored separately last up to 4 days if eggs were very fresh when cooked.
- Make-ahead: prepare yolk filling and refrigerate in an airtight container up to 48 hours; pipe just before serving for best presentation.
- Freezing is not recommended: texture suffers and yolks become crumbly after thawing.
- Allergy note: contains eggs and mustard; check mayonnaise label for allergens.
My favorite part of these is how small refinements change the personality of the dish: switching to dill pickle and adding a splash of pickle brine brightens the filling, while a few crumbled bacon pieces turn them into a more savory, hearty bite. Family members often debate the best garnish — paprika for the classicists and chives or crispy prosciutto for those who like a bolder finish. No matter the version, these are the trays that disappear fastest at gatherings.
Storage Tips
Store assembled halves in a single layer in an airtight container, separating layers with parchment to prevent sticking. Keep chilled at 40°F (4°C) or below and consume within 2–3 days for optimal safety and quality — freshness of the eggs at cooking influences this window. If you need to prep earlier, refrigerate whites and filling separately; transfer filling to a piping bag and chill until ready to assemble. Reheat is unnecessary: serve cold or at slightly chilled temperature. Avoid freezing as egg yolks change texture and become gritty when thawed.
Ingredient Substitutions
For a lighter filling, replace half of the mayonnaise with plain Greek yogurt (1/6 cup each). Swap Dijon for yellow mustard if you prefer a milder tang. To make this dairy-free, ensure your mayonnaise is dairy-free (most are) and avoid yogurt substitutions. Use finely chopped dill pickles instead of relish at a 1:1 ratio for chunkier texture. For an avocado variation, fold in one medium mashed avocado and reduce mayonnaise by 2 tablespoons to keep the filling balanced.

Serving Suggestions
Present on a chilled platter lined with lettuce or in a deviled egg tray for stability. Pair with crisp pickles, crusty bread, or a simple green salad for a balanced spread. These are excellent alongside smoked ham, roasted vegetables, or as part of a brunch buffet with fresh fruit and pastries. Garnishes can elevate serving: try microgreens, smoked paprika, capers, or a small drizzle of hot sauce for guests who like heat.
Cultural Background
Stuffed egg preparations date back centuries, with variations across Europe and Asia. The modern American deviled egg — hard-boiled eggs halved and filled with a mayonnaise-based yolk mixture — became especially popular in the early 20th century as mayonnaise became a pantry staple. The term “deviled” historically referred to highly seasoned or spicy foods. Regional American twists include the addition of pickles, mustard, or paprika; Southern versions often incorporate pimento or hot sauce, while coastal recipes may add crab or smoked fish.
Seasonal Adaptations
Spring: fold in chopped fresh herbs such as dill and chives, and top with pea shoots for freshness. Summer: add diced sun-dried tomato or swap relish for finely chopped cornichons. Autumn: fold in roasted pumpkin seeds for crunch and a pinch of smoked paprika. Holiday winter platters benefit from a touch of truffle oil or finely chopped roasted chestnuts folded into the yolk for a festive twist.
Meal Prep Tips
For easy grab-and-go snacks, separate yolk filling and egg whites in small airtight containers: pipe the filling into whites at the last minute. Portion the filling into individual silicone cups or reusable piping bags and freeze flat; thaw overnight in the refrigerator and assemble within 24 hours. Label containers with the cook date and use within the recommended 2–3 day window. Keep a small squeeze bottle of fresh paprika or chopped herbs handy to finish just before serving so the presentation stays vibrant.
These deviled eggs are simple, satisfying, and endlessly adaptable — a small but mighty addition to any table. Make them your own, and don’t be surprised when guests ask for the recipe (and the biggest platter!).
Pro Tips
Add 1 teaspoon baking soda to the boiling water when using stovetop method to make peeling easier.
Cool eggs in a full ice bath for at least 5 minutes to stop cooking and firm the whites for easier handling.
Use a piping bag fitted with a large star tip for an attractive presentation and consistent portioning.
If filling is too thick, thin with a teaspoon of pickle brine or a small splash of milk until it reaches the desired consistency.
Season the filling after mashing yolks — salt intensifies as the mixture sits, so taste before adding more.
This nourishing classic deviled eggs recipe is sure to be a staple in your kitchen. Enjoy every moist, high protein slice — it is perfect for breakfast or as a wholesome snack any time.
FAQs about Recipes
Can I prepare deviled eggs ahead of time?
Yes. You can make the yolk filling up to 48 hours ahead and store it in an airtight container in the refrigerator. Keep whites separate and assemble before serving for best texture.
Can deviled eggs be frozen?
Avoid freezing assembled eggs — the yolks become grainy and the whites rubbery. If you must freeze, freeze only the filling flat in a sealed bag, thaw overnight in the refrigerator and re-whip before piping.
Tags
Classic Deviled Eggs
This Classic Deviled Eggs recipe makes perfectly juicy, tender, and flavorful steak every time! Serve with potatoes and a side salad for an unforgettable dinner in under 30 minutes.
Instructions
Hard boil eggs (stovetop)
Place eggs in a saucepan and cover with cold water by 1 inch. Bring to a boil, stir in 1 teaspoon baking soda, cover, remove from heat, and let rest 12 minutes. Transfer to an ice bath for at least 5 minutes.
Hard boil eggs (Instant Pot)
Add 1 cup water and a rack to the Instant Pot. Place eggs on rack, cook on high pressure for 5 minutes, allow a 5-minute natural release, then transfer eggs to an ice bath for 5 minutes.
Hard boil eggs (oven)
Preheat oven to 325°F. Place eggs in muffin tin cups and bake for 30 minutes. Move eggs to an ice bath for 5 minutes before peeling.
Peel and halve eggs
Crack and peel cooled eggs under running water if needed. Slice each egg lengthwise and transfer yolks to a bowl, keeping whites intact.
Prepare filling
Mash yolks with mayonnaise, pickle relish, and Dijon mustard until smooth. Season with salt and pepper and adjust texture with more mayo or a splash of pickle juice if desired.
Assemble and garnish
Spoon or pipe filling into egg white halves, dust with paprika and garnish with chives or bacon if desired. Chill briefly before serving.
Last Step: Please leave a rating and comment letting us know how you liked this recipe! This helps our business to thrive and continue providing free, high-quality recipes for you.
Nutrition
Did You Make This?
Leave a comment & rating below or tag
@kitchenfunwithmy3sons on social media!
Categories:
You might also like...

3 Ingredient Cottage Cheese Egg Muffins for a Fluffy Breakfast
Simple, protein packed muffins made with eggs, cottage cheese, and a pinch of salt. Keto friendly and ready in under 35 minutes for busy mornings.
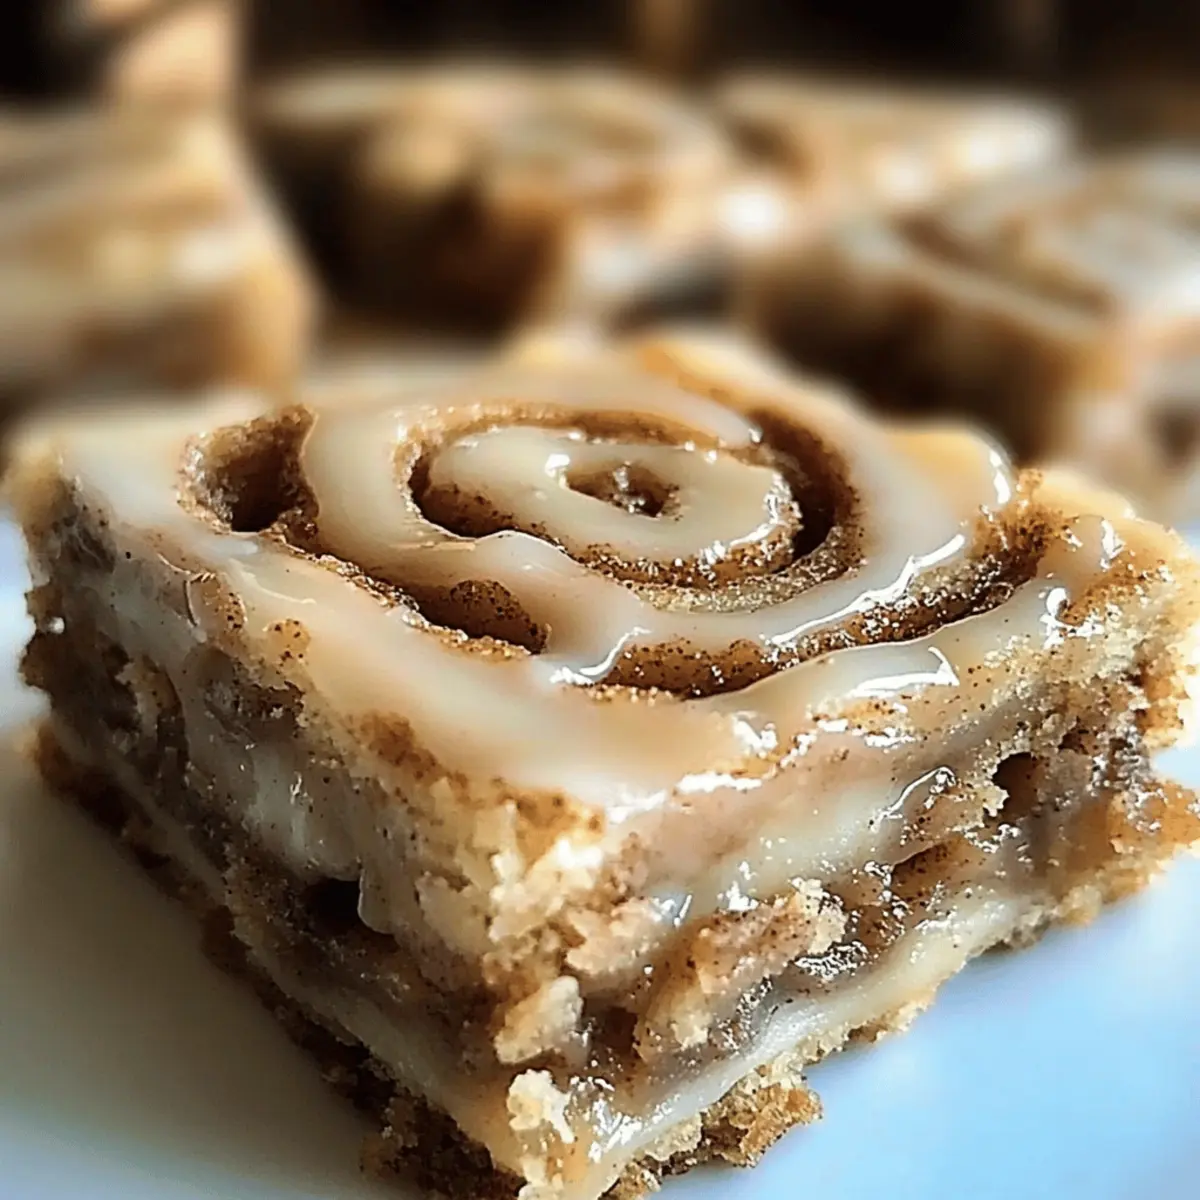
Cinnamon Roll Bliss Bars: Easy Bars for Sweet Moments
A fast and comforting twist on the classic cinnamon roll, these bars are sticky, tender, and glazed to perfection. Ready in under an hour and perfect for sharing.
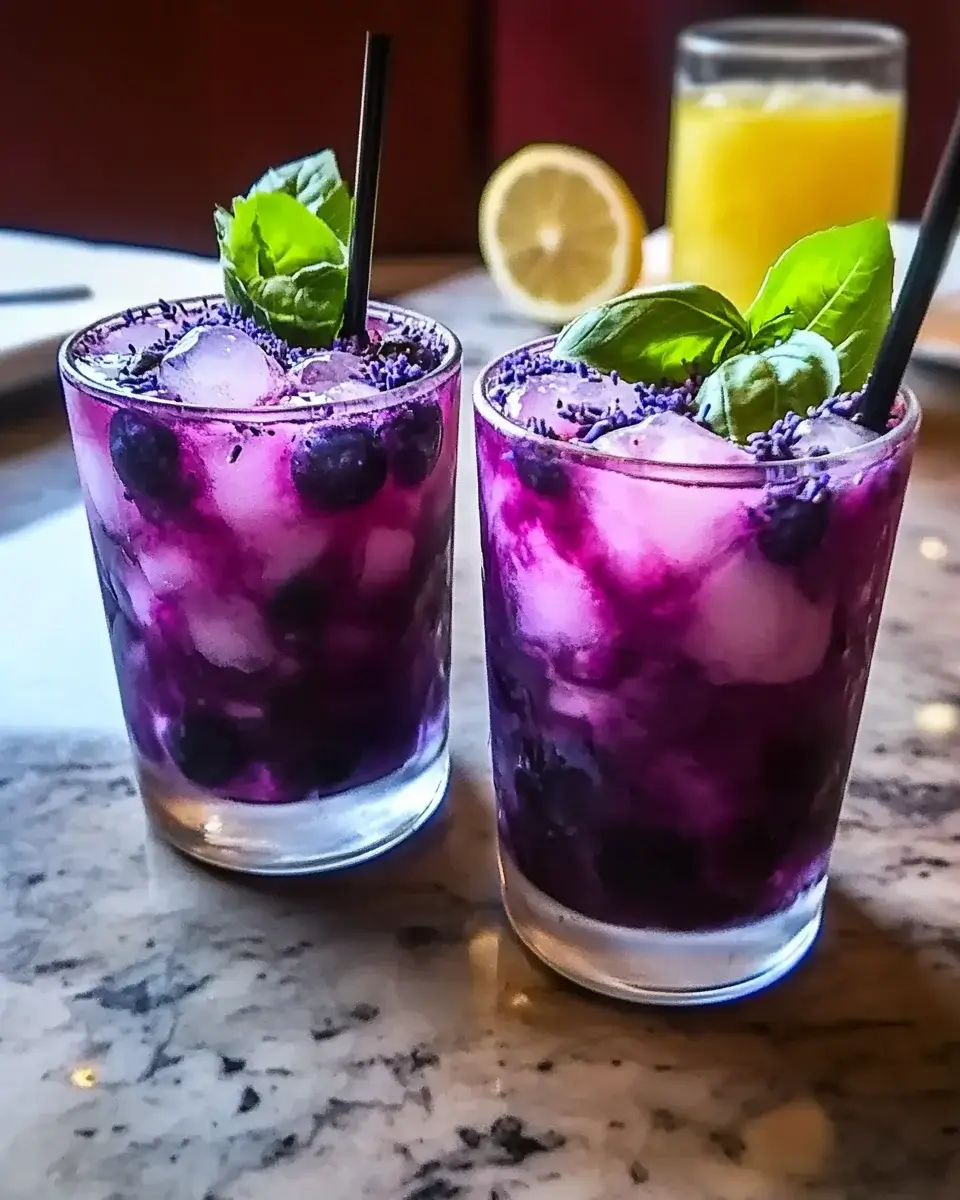
Blueberry Basil Lemon Lavender Mocktail
A bright, aromatic mocktail that blends fresh blueberries, fragrant basil, zesty lemon, and floral lavender syrup for a refreshing drink perfect for warm days.
Did You Make This?
Leave a comment & rating below or tag @kitchenfunwithmysons on social media!
Rate This Recipe
Share This Recipe
Enjoyed this recipe? Share it with friends and family, and don't forget to leave a review!
Comments (1)
This recipe looks amazing! Can't wait to try it.
Comments are stored locally in your browser. Server comments are displayed alongside your local comments.
Hi, I'm Emily!
What's Popular

Get My 30-Minute Meals email series!
Quick and easy dinner ideas delivered to your inbox.